Once you have set up your beehives and your bees have made their homes in them, you will need to start examining the hives at regular intervals to ensure everything is functioning as it should be. Bees are amazingly adaptive insects and they thrive with a little help from their keepers. Regular inspection is an excellent way to observe and support your little friends as they forage for nectar and produce honey in their hives.
When Should You Examine Your Hive?
First and foremost, you will need to pick the perfect day for examining your hives. Choose a sunny day when temperatures are well above 60o F. Ideally you would want to time your activity so that most of the bees are away from the hive collecting nectar (Around 10am to 2pm).
Another factor to consider is the barometric pressure. Opt for a day where the pressure scale is level or rising. This is because cloudy or stormy weather can make bees behave aggressively, and thus is not a good a time for hive examination. Avoid hive inspection if there is a storm forecast or if the weather is too cold.
Preparing Yourself For A Hive Inspection
Bees cannot see very well, so they’ll likely sense your presence through vibration and smell. Ensure that you do not have any strong odour or excessive perfume on yourself. You should also make sure that you take all necessary tools with you to avoid having to go back to get something you’ve forgotten, drawing out the examination process.
Another important aspect is to remain calm. Observing your bees in action is a wonderful experience and you will be able to carry out your work better when you are not stressed out. Additionally, always steer clear of the active path of the bees so that you can examine the hives with minimal distraction to the bees.
Some beekeepers prefer to wear white when examining their hives, as they have found that bees show more aggression toward darker colors.
What Tools Do You Need For A Bee Hive Inspection?
While Beekeepers may argue about what tools, if any, they need for a hive examination, there are some basic things most agree are a good to have, especially if you’re new to Beekeeping. These include: A beekeeping suit, gloves, smoker, scraper, frame grip, and brush.
Beekeeping Suit: Look for a suit that fits well, boasts good ventilation, is thick enough to stop stings, and has easy to use zippers so you can zip/ un-zip with gloved hands.
Beekeeping Gloves: Look for gloves with a snug fit, as lose gloves will only further lessen your dexterity. You’ll also want gloves that are well ventilated and are thick enough to lessen the chance of a sting.
Smoker: You’ll want a smoker that has good heat protection, is made from a good quality metal, has a mounting hook for storage and safer cooling, and is easy to use with one hand.
For more on using a smoker, read our article: How To Use A Bee Smoker
Scraper, Frame Grip and Brush: While many offerings look similar, we recommend not going with the cheapest options for these tools, as a poor Frame Grip can cause a dropped frame, and a cheap brush can leave bristles behind. This starter set is a great affordable option that doesn’t skimp on quality.
What to Look for During Hive Examination
Here are the main things that you need to keep your eyes out for-
Check up on the queen bee – During each inspection look for the queen bee in the hive and ensure that she is thriving and laying eggs. An easy way to find the queen bee is to hold up the frames to light and searching for the eggs.
Look at the brood pattern – The brood pattern is an indication of the health of the queen bee. the desirable brood pattern should be tight, with adjacent cells occupied with eggs, capped brood or larvae. A brood pattern with many empty cells and a sparse population of eggs usually point towards the failing health of the queen.
The health of the brood – Not only the brood pattern but also the brood health is an important factor that requires close monitoring. If the brood is not as healthy as it should be then it indicates other issues like diseases or non-conducive hive environment.
Any indication of mites – You should check closely for any signs of mites in the hives so that they can be handled right at the beginning. Mites are detrimental to the growth of the bees and can affect the entire hive in no time.
Food stores and cell health – Check for the amount of food and honey stored in the cells. Also, take a look at the general health of the hive cells. Do they look firm and are in the right shape? Or do they seem to be collapsing? All these are indications about the hive health.
Any other issues from previous inspections – Needless to say, if you had found any issues in your prior hive inspection, then you need to check up on the same the next time.
Removing The Outer & Inner Frames
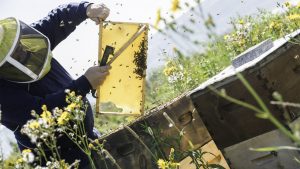
While you can inspect from any side of the hive, it is best to start from the back or the top so that the entry to the hive remains free for the bees. Follow these steps to remove the outer and inner frames-
- Using a smoker, gently blow one or two puffs of smoke at the hive and wait for a couple of minutes for it to take effect.
- Insert the hive tool’s curved end between the first and second frames at one corner of the hive and pry open to separate (Repeat this at the other corner as well).
- The first frame should be loosened at this point, and you’ll be able to remove it carefully with both hands.
- Set it aside vertically. You can use a stand for this.
- Smoke again gently if necessary.
- Remove the second cover carefully using the same maneuverer with the hive tool and set it aside.
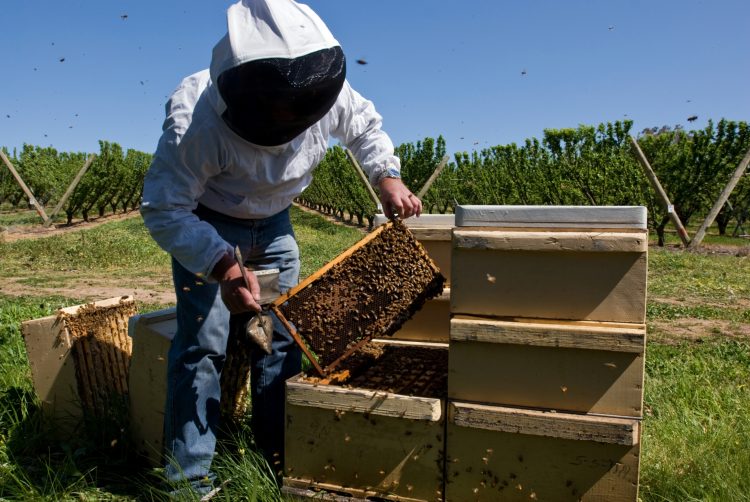
Inspecting The Individual Frames
Once you have the covering frames removed, it is time to carefully examine each of the individual frames one by one. A good practice to follow is to transfer the first couple of them to a frame stand and then shuffle the rest of them within the box. This allows you to check all the frames with minimum displacement.
While examining the frames, stand with your back to the sun so that the light falls on the frame itself. Hold it up by the two frame ends and gently turn it vertically first and then over like a page of a book. Once finished seeing, return it back to the hive in the original horizontal position.
Once done checking all the frames, take your time to close down the hive with care. Ensure that all the hive frames have been returned to their slots and the covers are back firmly in their place. It is never fun to finish closing your hive only to find a forgotten frame laying outside.
Bees are tiny, busy insects, that put in a lot of effort to produce honey and build their hives.
As a beekeeper, you can give them a hand by regular upkeep of the hives and providing a safe environment for growth. Think of it as a nice way of saying “thank you” for the honey we get to enjoy.
![3 Big Mistakes Beginner Beekeepers Make [And How To Avoid Them!]](https://beekeepingabc.com/wp-content/uploads/2020/11/3-mistakes-beginner-beekeepers-make-90x75.jpg)

![Move over ducks, Queen Bees quack too! [Here’s Why]](https://beekeepingabc.com/wp-content/uploads/2020/06/queen-bee-90x75.png)
![The Flow Hive 2 Review [ Vs. The Classic Flow Hive]](https://beekeepingabc.com/wp-content/uploads/2020/02/Flow-Hive-2-90x75.jpg)
![How Bees Fly [10 Facts About How, When, and Why]](https://beekeepingabc.com/wp-content/uploads/2019/12/A-Bee-Flying-90x75.jpg)